Shopping and Inventory Features in BeerSmith 4
This week I take a closer look at the new inventory system in BeerSmith 4 which lets you maintain both local or cloud based inventories of your brewing ingredients.
Summary of New Features
Out previous version, BeerSmith 3 stored inventory data in the local ingredients files, which was not an ideal solution as working with inventory often required moving across several views. When the Web based version of BeerSmith was launched several years ago, it was set up with a separate inventory table which was a more flexible approach. However since the web based inventory could not be accessed from the old BeerSmith 3 desktop, you could not easily manage a shared inventory unless everyone used the web version exclusively.
With the new BeerSmith 4 we moved to a SQL database with separate inventory and shopping list tables, and also integrated the cloud based inventory and shopping list into the program so now you can work with that data directly from your desktop program.
This is very powerful for people who want one view of their inventory including individuals who work on multiple devices and small breweries who want to maintain a simple shared view of inventory.
Importing Existing BeerSmith 3 Inventory
For those who are just starting with BeerSmith 4, you can import your existing BeerSmith 3 inventory easily:
Start by going to File->Import BeerSmith 3 or 2 data
Assuming your data is on the same computer it should locate it. Select Import This Directory assuming it is found. If not you can backup your old computer in BeerSmith 3 with File->Full Backup to Zip and use File->Recover from Zip to recover the data from your old computer.
Next you want to select just the inventory so use the selective import by clicking the button Open Tables in Separate Tabs
This will display a list of tables to import. In this case, un-check the recipes and equpment and select on the Inventory table at the bottom
Press OK and it will import the inventory data and open it in a separate tab
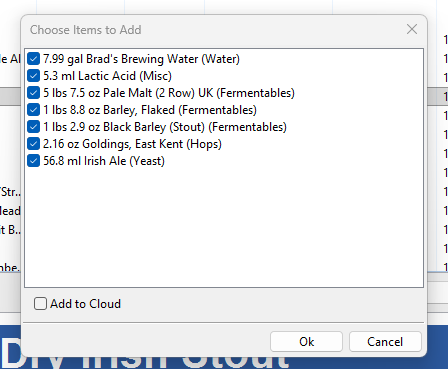
Next you can copy and paste any data you want from the open inventory tab over to either your Cloud or Local inventory views. Use Edit->Select All to select everything first or alternately you can hold the shift or control keys while selecting to select multiple items.
Cloud Mode vs Local Mode
When you started BeerSmith 4, you could select either Cloud or Local mode on startup. The drives your primary storage location though you still have access to either using the Cloud and Local menus and shortcuts. However the selection of Cloud or Local also drives your primary inventory used when you add inventory columns to the design view or ingredient views (see below) as well as the primary inventory for inventory and shopping operations.
For example if you add the inventory column to your recipe design view (see below), it will show cloud based inventory if you are in cloud mode, or local inventory if you are in local mode. Note that you can change modes easily using the Tools->Startup Options dialog.
Adding Extra Inventory Columns to Various Views
For simplicity, not all of the inventory fields are turned on by default. For example if want to see matching inventory for a recipe you need to enable the inventory field in recipe design view. To do so, open any recipe in BeerSmith, and then right click on the Ingredients column header. This will bring up a popup menu with a Customize Columns option. If you pick this you can then add the Inventory column and it will now show matching inventory for each ingredient in the recipe. You only need to do this once.
Similarly from Shopping View you can add the columns Inventory and Needed and it will show the quantity of matching items in inventory as well as how many are needed to complete your shopping list. Do this by either right clicking on the column header or going to View->Customize Columns on the menu. The same is true for various ingredient views (Ingredients->Hops for instance). You can add a inventory column to show current inventory for all items in the ingredient view.
Keep in mind, that all of these fields mentioned above are based on either Cloud or Local mode, so the program will show cloud based inventory in cloud mode and local when in local mode.
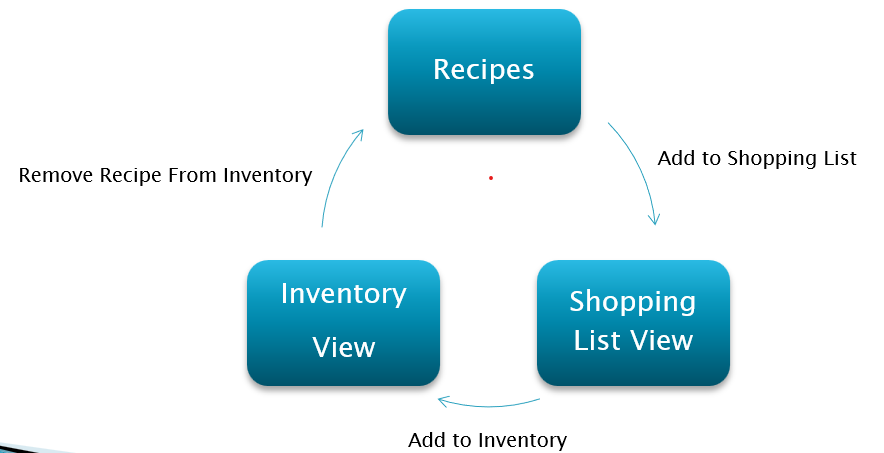
Working Between Recipes, the Shopping List and Inventory
Like BeerSmith 3, you can easily add a recipe's ingredients to your shopping list, and move items from that shopping list into inventory once you purchase them. Then when you brew a given recipe you can remove the ingredients for the recipe from inventory completing the inventory loop.
One of the most frequent inventory questions I get for BeerSmith 4 is Where did the Inventory buttons go? To simplify the toolbar in design mode, I did move the Add to Shopping List and Remove from Inventory buttons to the main Local/Cloud Recipes views as shown here: